Data navigation
Opening multiple data files
It is possible to open multiple *.dmd data files and to review them.
In order to open several files, there are two options. Click on the folder icon in the Action bar (see Fig. 598) and select the files to be opened or open the full menu of the Measurement Settings > Analysis Files and click on Add file… (see Fig. 597) and select all files to be opened and reviewed.
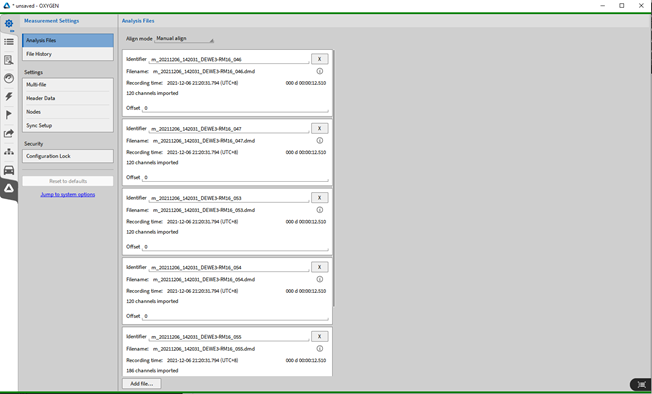
Fig. 597 Opening multiple data files in the Measurement Settings menu
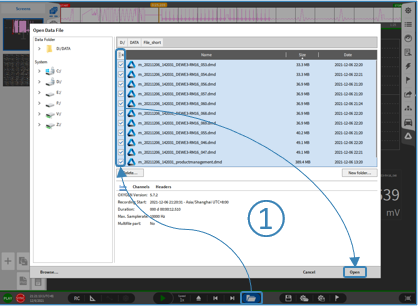
Fig. 598 Opening multiple data files
An identifier can be given to the single files, in order to better differentiate between them when analyzing and reviewing them. The original file name will not be changed.
Single files can be removed again, by clicking on the X. By clicking on the circled i, more information can be displayed for each file.
It is possible to align the files on their time axis, to align them to the recording start or to specific events.
Manual align: enter an offset in seconds for the files in order to align them to a specific event.
Align to recording start: in case the files were recorded during different periods of time, it is possible to align all files to their recording start.
Align to absolute time: in case absolute time was used for the recordings, the files can be aligned to the absolute time.
All these options are also available in the small measurement settings menu.
The single files with all the channels are available in the Channel List and shown as individual sections.
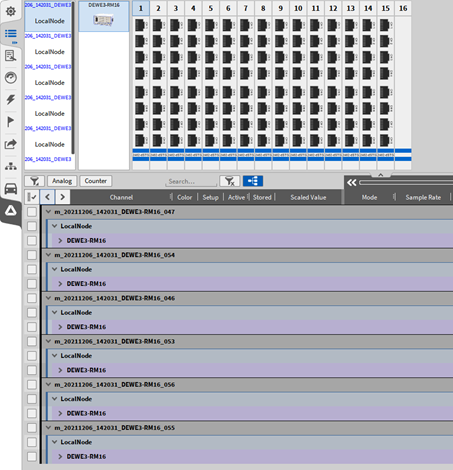
Fig. 599 Multiple data files shown as individual sections in the Channel List
All channels from each file can be used for offline math and visualized on the measurement screen. A new data file can be stored, including all channels from each file (see ⑬ in Fig. 14).
Batch processing
Changes, which were done in a measurement file during analysis and post-processing can also be applied to other measurement files. This can be very useful when having measurement series or campaigns, where changes can then be applied to all files. The same setup must have been used for all files and all files must include the same recorded channels, to apply the changes. Following changes will be applied:
Offline math (formulas, power groups, etc.)
Offline changes in the channel list (CAN channels, etc.)
Changes to the measurement screen (instruments)
To do so, simply open one measurement file. After doing the analysis and post-processing save the file, open the full menu of the Measurement Settings and go to File History (see Fig. 600). By clicking on the Button Apply changes to other measurement files… the files can be selected from the dialogue which will open (see Fig. 601). Files within the same folder can be selected.
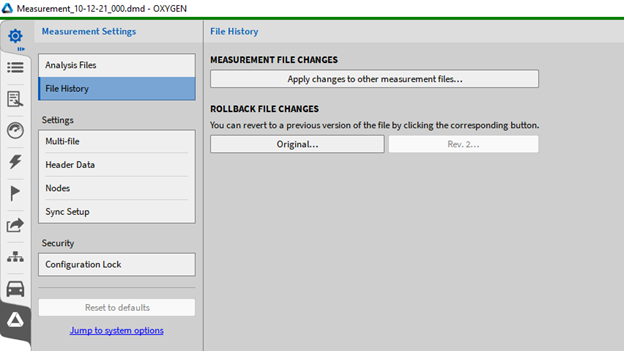
Fig. 600 Applying offline changes from one measurement file to others
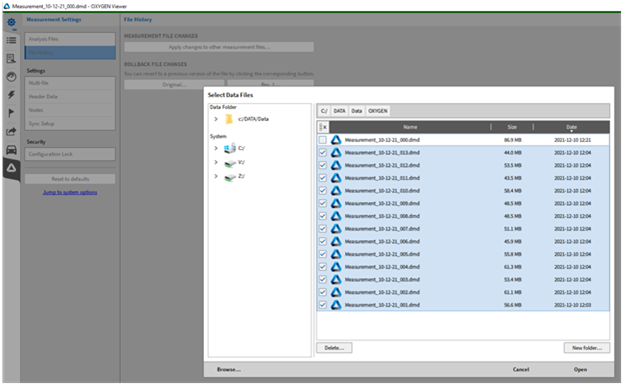
Fig. 601 Selecting the files for the batch processing
After selecting the files, click Open and a new dialogue will open (see Fig. 602). To apply all changes press Start. Fig. 602 shows the dialogue after the processing is done to all files successfully.
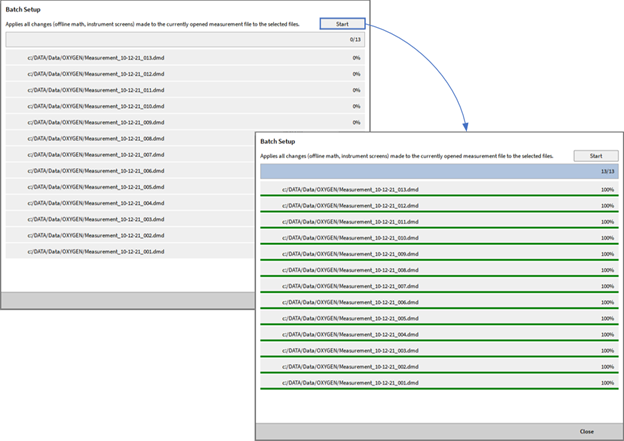
Fig. 602 Batch processing before start and after it finished successfully
The dialogue will also show any errors, in case the processing cannot be fulfilled. These files will be ignored, in case the processing is started anyway.
Possible reasons for this could be:
File not accessible and cannot be opened, because it might be already open.
Channels are not the same for each file. This file might not be recorded with the same *.dms setup such as the other files.
Duplicate channel names in the setup.

Fig. 603 Error message shown for the batch processing
To return to your original file or later revision, click on the corresponding button under Rollback file change seen in Fig. 600. The changes made to the file will be deleted.
Deleting channels in recorded files

Fig. 604 Disabling the stored flag
Removing channels from recorded *.dmd files can be desirable to reduce file size and for a concise channel list overview. To do this, disable the stored flag in the channel list (see Fig. 604). Subsequently, saving the *.dmd file as a new file (see Measurement settings and Fig. 94 for more information) will delete the channel from the channel list in the new file and the stored data of the channel will be removed from the file, thus reducing the file size.