Export Settings
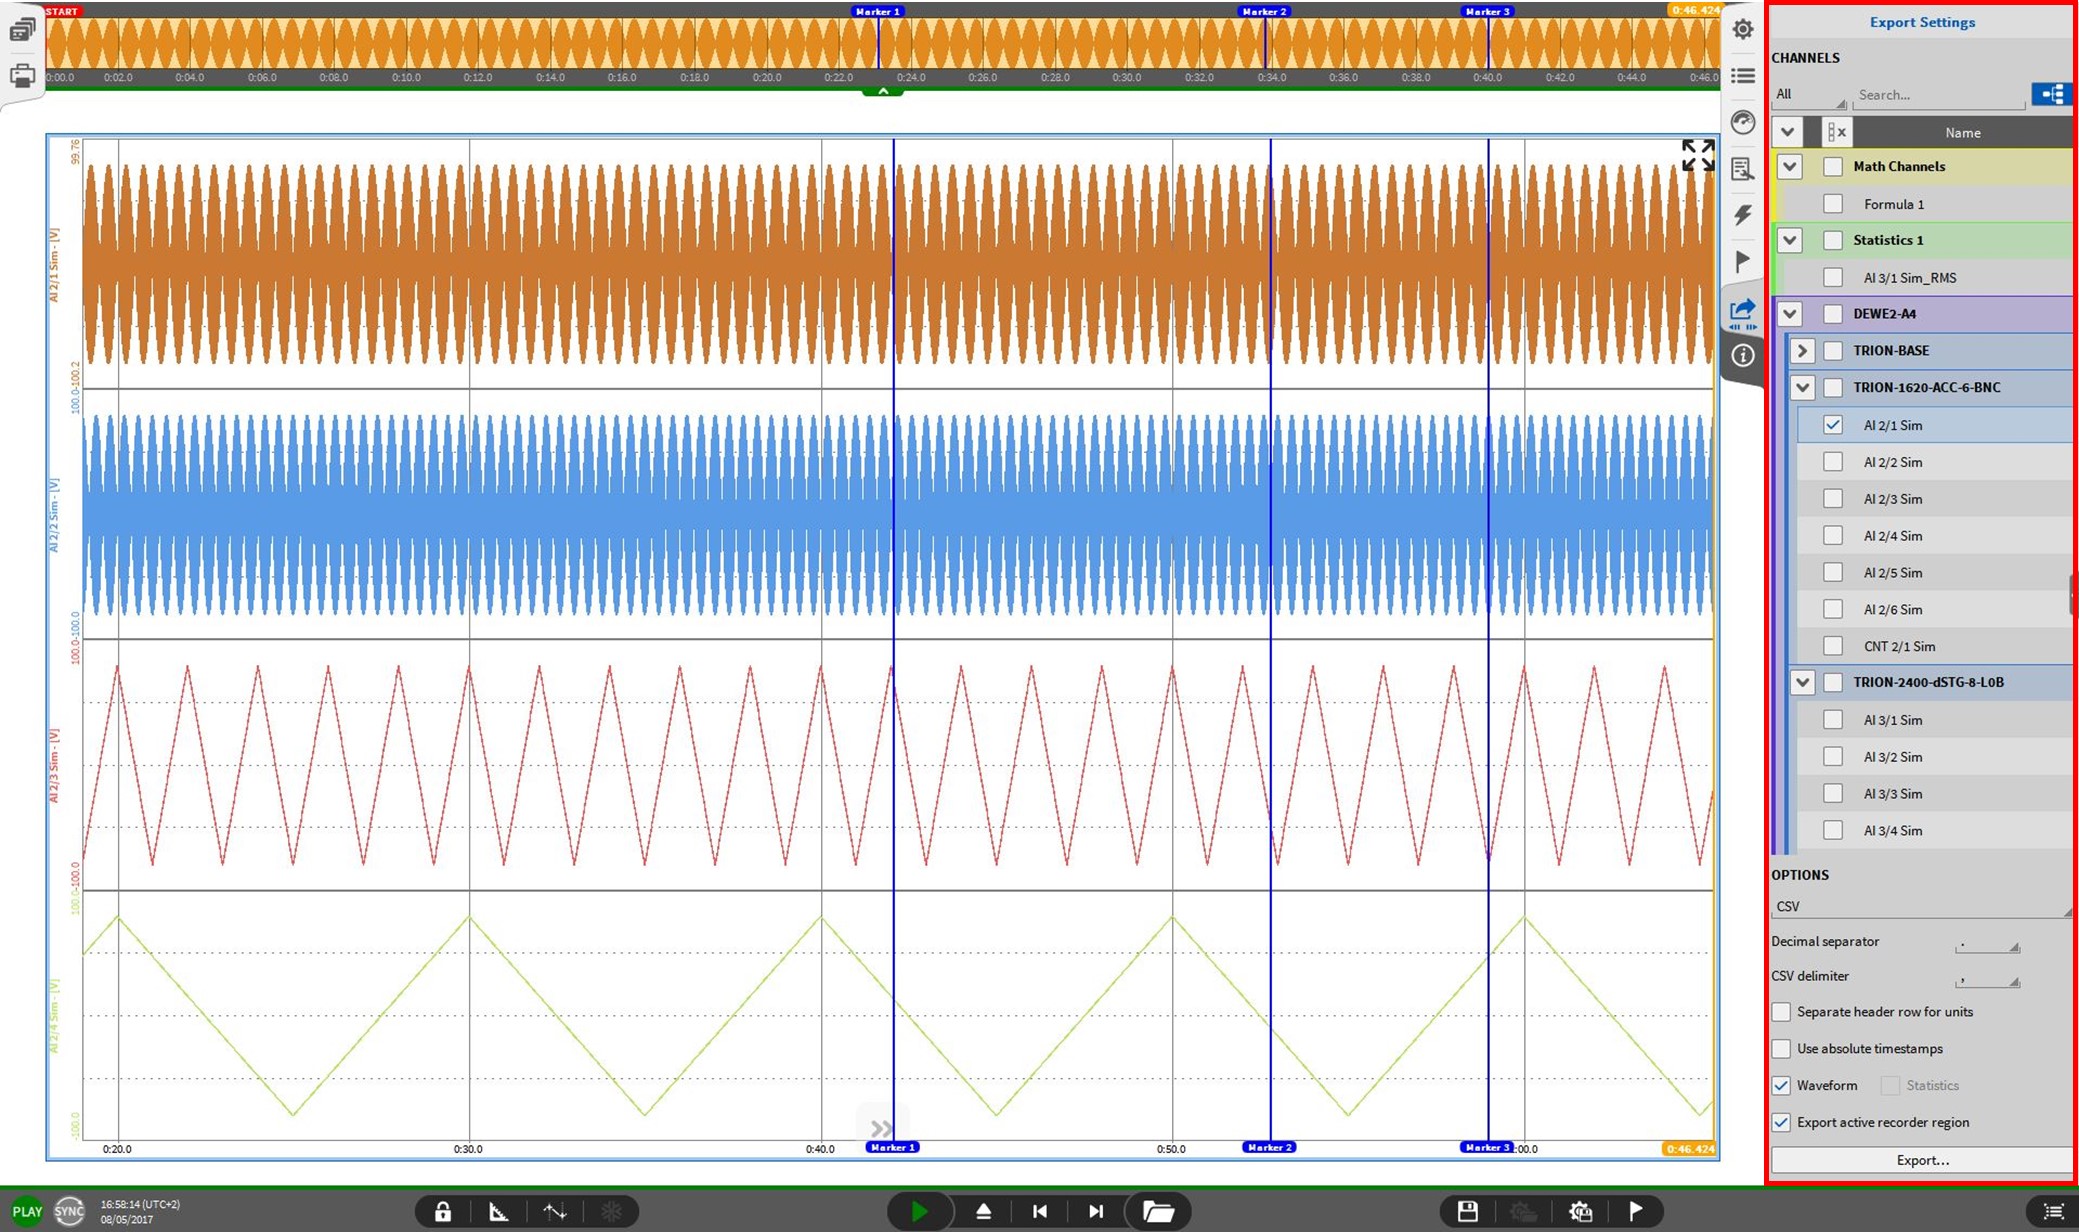
Fig. 572 Export Settings – Overview and export options for a *.csv-file
In PLAY mode, the user can export the recorded data into the following formats:
Export formats |
|
|---|---|
*.csv-file |
*.txt-file |
*.mdf4-file |
*.mat‑file |
*.xlsx-file |
*.rsp (rpc III)-file |
*.wav-file |
*.dat-file (DIADEM) |
*.nt-file (DynaWorks) |
*.h5-file |
*.uff-file (Universal File Format 58; Binary and ASCII) |
*.imc-file (FAMOS) |
*.tdms-file (LabVIEW) |
*.nc-file (NetCDF) |
*.datx-file (DSPcon) |
|
The user can select the channels to be exported in the channel list displayed in the Export Settings (Fig. 572).
To change the order of exported channels, use the order tab in the export menu. Select channels to be exported ① and click on the Order tab ②. Next switch the order of channels to your requirements ③. To use this changed order, tick the “Export in configured order” checkbox before exporting the channels. This results in an individual channel order in the exported file ⑤.
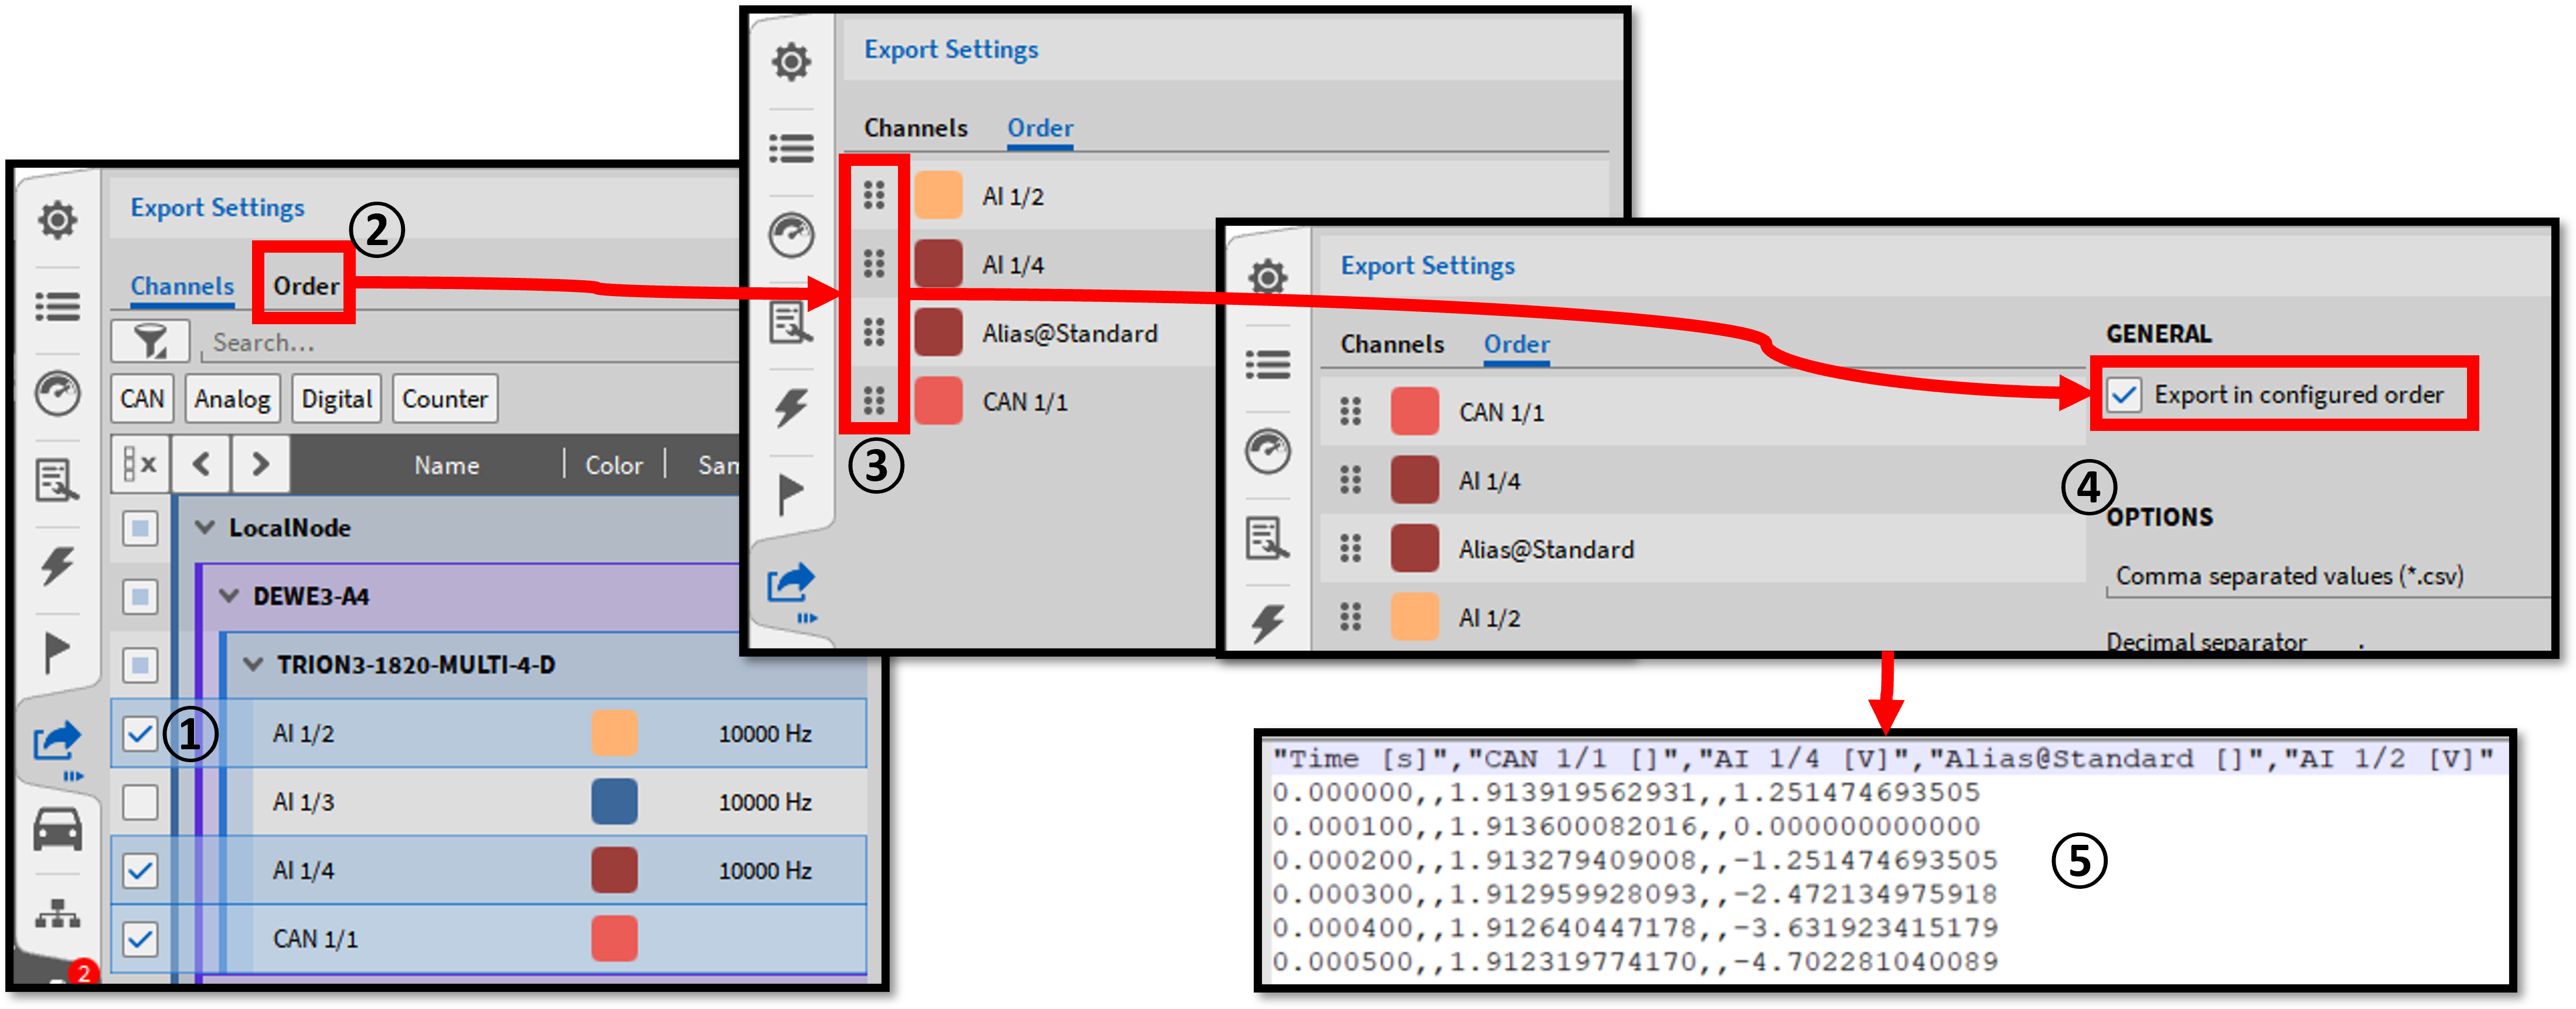
Fig. 573 Edit channel export order
Export active recorder region or between cursors
The user has the possibility to only export the active recorder region of the selected recorder or the region between the cursors. Depending on whether the cursors are activated, one of the following options to export (see Fig. 574) can be seen. This option is available for all file formats.
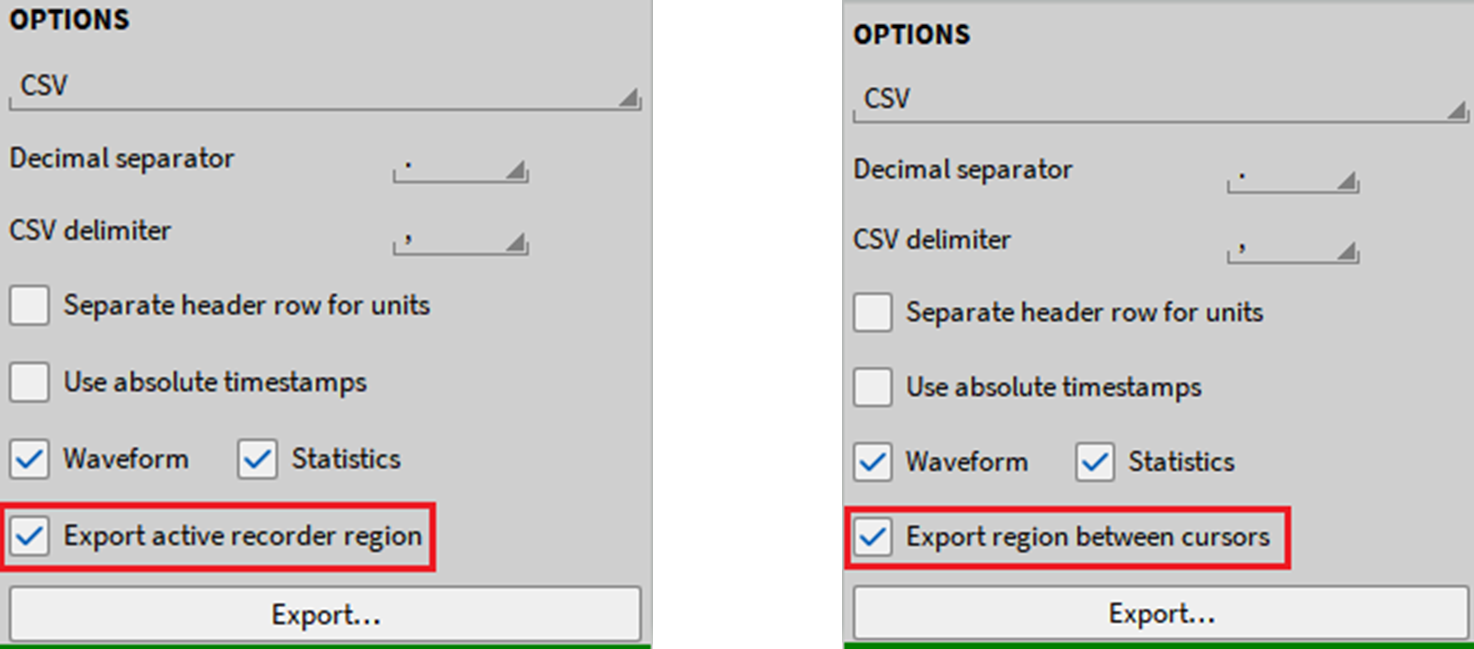
Fig. 574 Export active recorder region or between cursors
Note
These options are only available if the export menu is not enlarged and opened to full size. If the menu is enlarged to full size or these options are deactivated the whole recorded data will be exported.
Export triggered data file with trigger aligned to zero
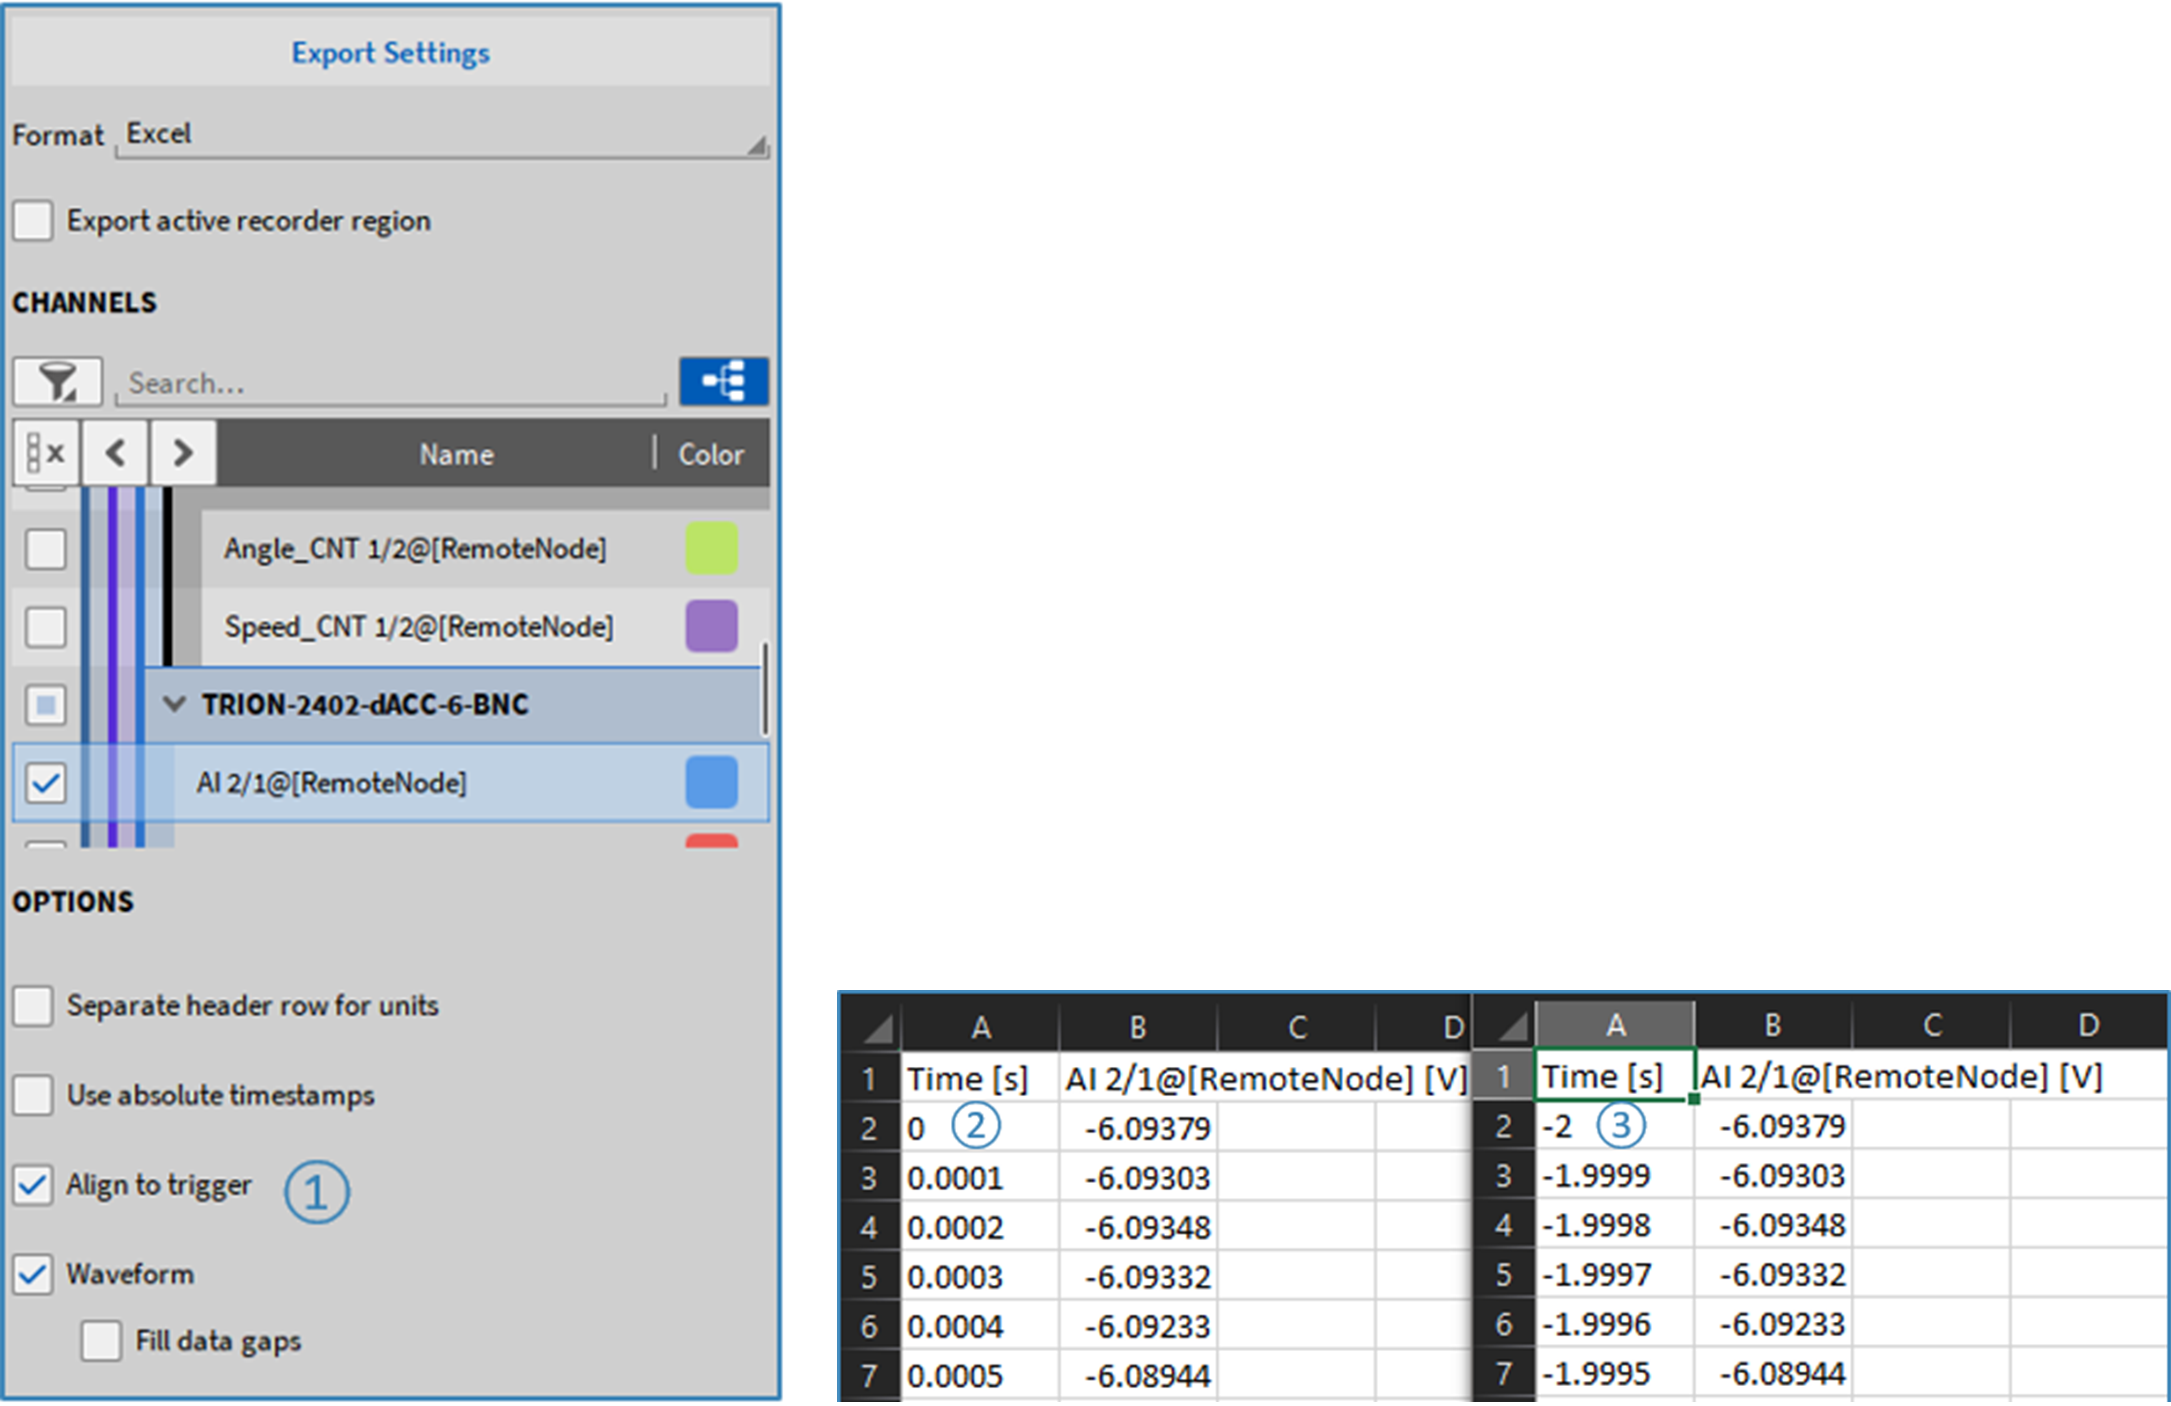
Fig. 575 Align timestamps in exported file to zero
Timestamps in an exported data file with a triggered event can be aligned to the trigger (see ① in Fig. 575). If align to trigger is not selected, then the 0s timestamp will be at recording start, not at the trigger (see ② in Fig. 575). If align to trigger is selected, the timestamp at the trigger will then be set to zero. Thus, the time leading up to the trigger event (e.g. the pre-time) will be negative (see ③ in Fig. 575).
If more than one trigger event is in a recording, then the first trigger event will be set to zero, when the align to trigger option is selected.
This option is possible for *.txt, *.csv and *.xlsx-export.
Export with reduced sample rate
When exporting data, it is possible to reduce the sample rate of selected channels. To do this, enable the Reduced sample rate option in the export settings and choose the desired rate from the dropdown menu. Available rates range from 1 Hz to 10 kHz. This option is supported for the following export formats: .xlsx, .csv, and .txt.
Note
Reducing the sample rate will skip data points—it does not perform averaging or interpolation. The reduced sample rate export can be used to match asynchronous data e.g. from CAN to synchronous data.
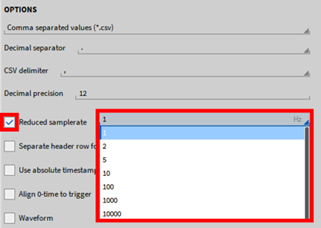
Fig. 576 Export channels with reduced sample rate
Export Options for a *.csv-file
If *.csv is selected as format, the user has the following additional options (see Fig. 577):
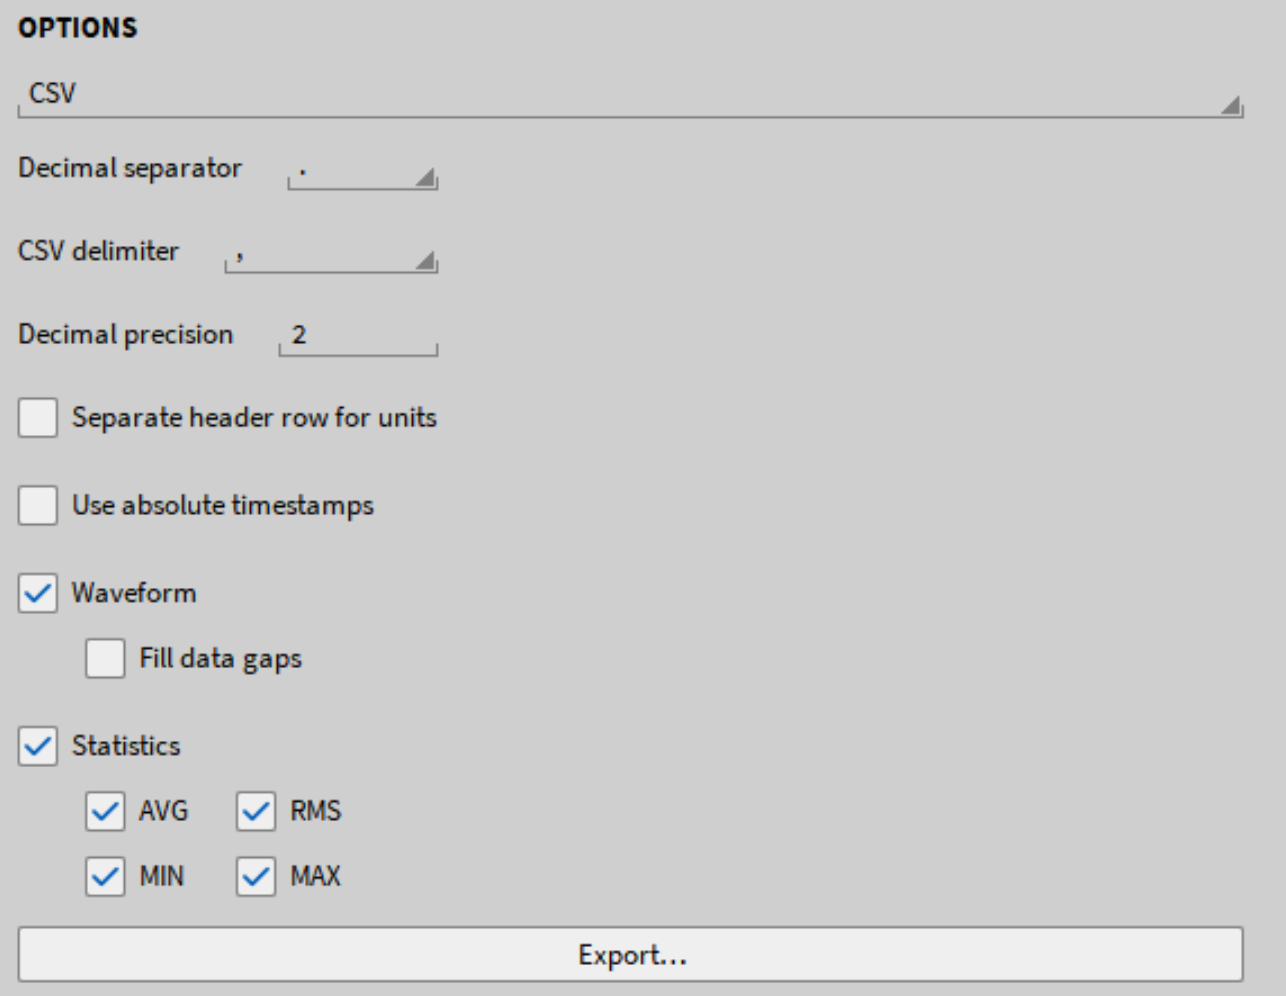
Fig. 577 Export Options for a *.csv-file
Choose between Decimal separator ‘.’ and ‘,’
Choose between CSV delimiter ‘,’ and ‘;’
Select the decimal precision from 1 to 20 digits; the decimals will be rounded to the selected precision
For reduced sample rate see Export with reduced sample rate.
Selection of Separate header row for units will write the units in a separate row below the channel names
Select Use absolute timestamps or export relative timestamps
For Align 0-time to trigger see Export triggered data file with trigger aligned to zero.
Skip timestamps: Select if no timestamps shall be exported, only channel values will be exported
Waveform: select if the waveform data shall be exported.
Fill data gaps: select if data gaps shall be filled up when exporting channels with different sample rates. For channels with a lower sample rate, the samples will be repeated until the next sample is available.
Statistics: select which of the statistics parameters shall be exported
Export Options for a *.txt-file
If *.txt is selected as format, the user has the following additional options (see Fig. 578):
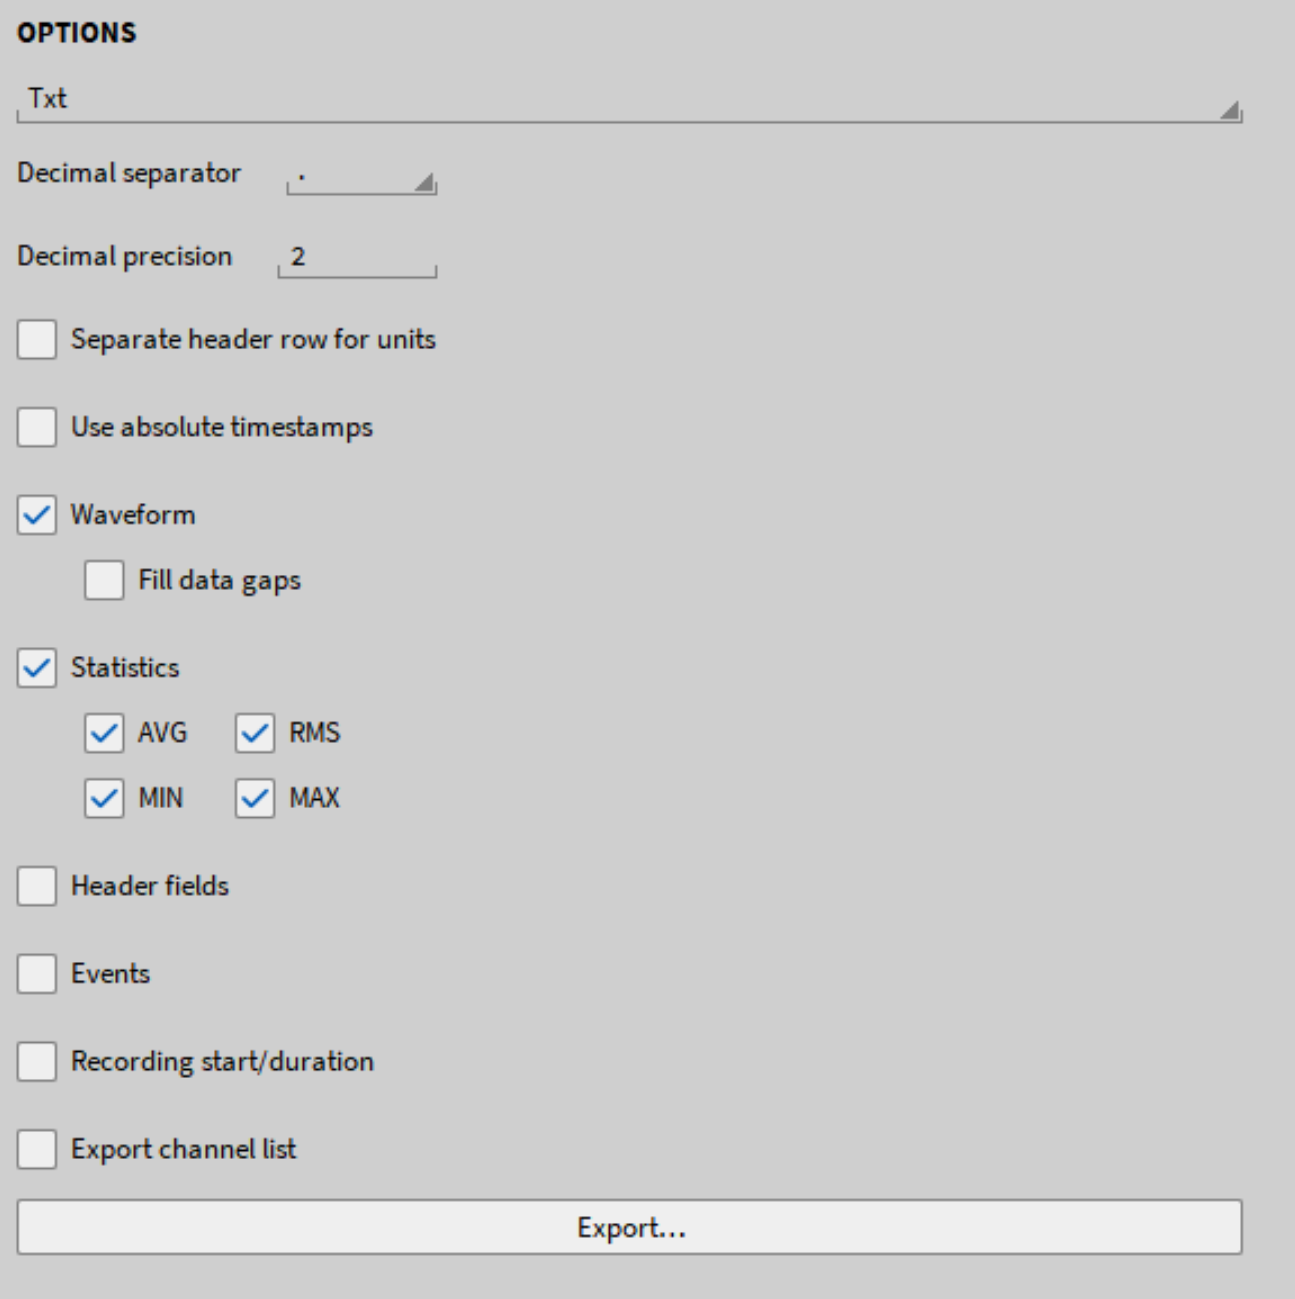
Fig. 578 Export Options for a *.txt-file
Choose between Decimal separator ‘.’ and ‘,’
Select the decimal precision from 1 to 20 digits; the decimals will be rounded to the selected precision.
For reduced sample rate see Export with reduced sample rate.
Selection of Separate header row for units will write the units in a separate row below the channel names
Select Use absolute timestamps or export relative timestamps
For Align 0-time to trigger see Export triggered data file with trigger aligned to zero.
Skip timestamps: Select if no timestamps shall be exported, only channel values will be exported
Waveform: select if the waveform data shall be exported.
Fill data gaps: select if data gaps shall be filled up when exporting channels with different sample rates. For channels with a lower sample rate, the samples will be repeated until the next sample is available.
Statistics: select which of the statistics parameters shall be exported
Select if the Header fields shall be exported to the file
Select if the Event List shall be exported to the file
Select if the Recording start and the Recording duration shall be exported to the file
Select if the Channel List shall be exported to the file
Export options for a *.mdf4-file
If *.mdf4 is selected as format, the user has the following additional options (see Fig. 579):
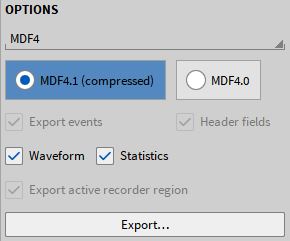
Fig. 579 Export options for a *.mdf4-file
Select if the data shall be exported to the compressed mdf4.1 or the uncompressed mdf4.0 format
Events and Header data will be exported per default. The check boxes are only displayed for information purpose
Select if Waveform data and/ or Statistics data shall be exported
Export options for a *.mat-file
If *.mat is selected as format, the user has the following additional options (see Fig. 580):
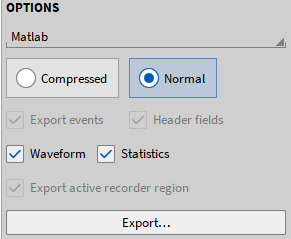
Fig. 580 Export options for a *.mat-file
Choose between Compressed and Normal export
Compressed: The *.mat-file will be compressed during export. Thus, the Compressed export will take more time than the Normal export
Normal: The *.mat-file will not be compressed during export. Thus, the Normal export will be quicker than the Compressed export, but the resulting *.mat-file is larger
The exported file format is a 7.3 MAT-file
Events and Header data will be exported per default. The check boxes are only displayed for information purpose
Select if Waveform data and/ or Statistics data shall be exported
Export options for an *.xlsx-file (Excel)
If Excel is selected as format, the user has the following additional options (see Fig. 581):
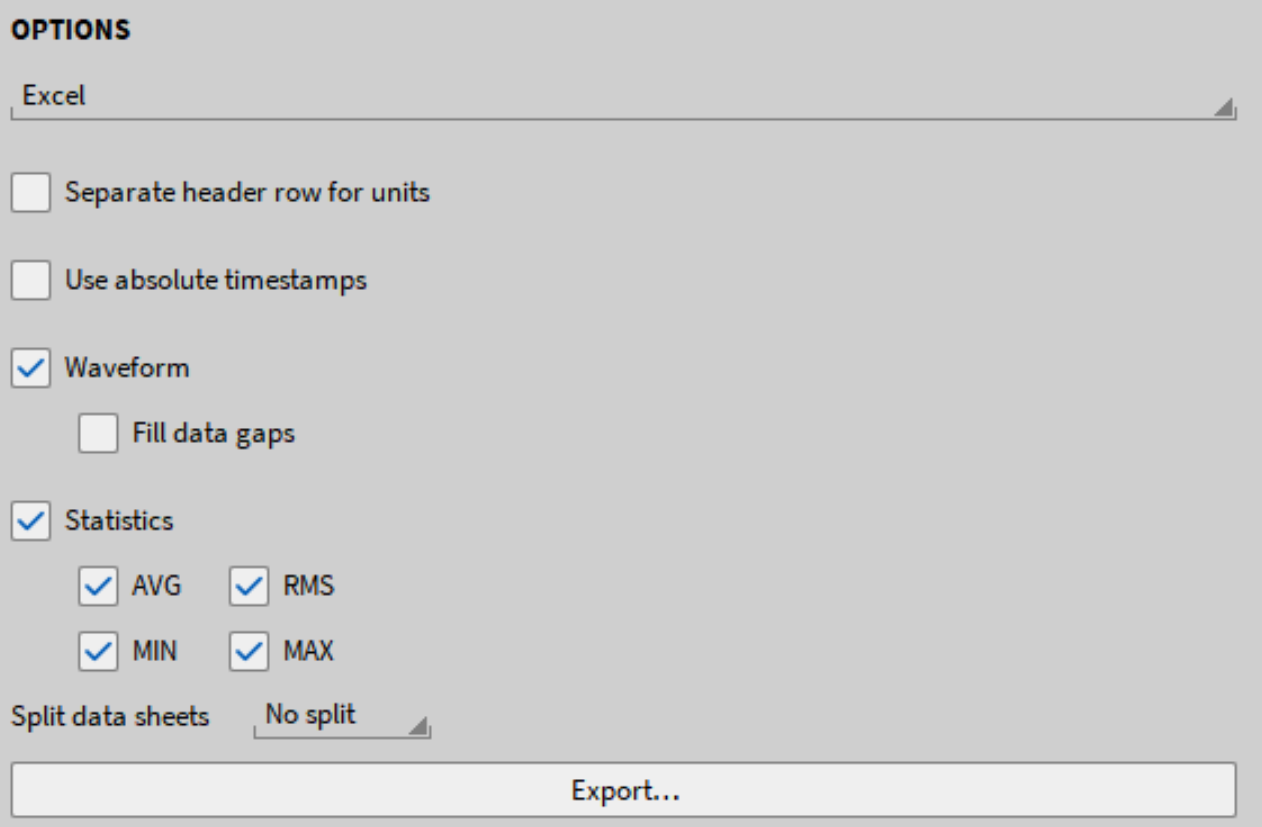
Fig. 581 Export options for an Excel-file
Selection of Separate header row for units will write the units a separate row below the channel names
Select Use absolute timestamps or export relative
Select Header fields to export header data in a separate Excel spreadsheet.
Skip timestamps: Select if no timestamps shall be exported, only channel values will be exported
For reduced sample rate see Export with reduced sample rate.
Waveform: select if the waveform data shall be exported.
Fill data gaps: select if data gaps shall be filled up when exporting channels with different sample rates. For channels with a lower sample rate, the samples will be repeated until the next sample is available.
Align 0-time to trigger: see Export triggered data file with trigger aligned to zero.
With Split data sheets, select if a new spreadsheet should be created per file (for multi-file recordings) or per event (for triggered recordings). Otherwise, select no split.
Note
As the number of lines on one Excel spreadsheet is limited to 1048576 (220) the data will be written to a new spreadsheet if this limit is reached.
Export Options for a *.rsp (rpc III)-file

Fig. 582 Export options for a *.rsp-file
There are currently no options to select.
Export Options for a *.wav-file

Fig. 583 Export options for a *.wav-file
Selection of PCM or Float Format
PCM: 16-bit integer format
Float: 32-bit floating point format
The PCM format results in an export file, which is half the size of the float format file but is also less accurate.
Export Options for a *.dat-file (DIADEM)

Fig. 584 Export options for a *.dat-file
DIADEM-Export only supports the export of Waveform data but no support of Statistics (Reduced) data. The format only supports the export of scalar channels such as analog channels and formulas.
When exporting data, three separate fiels will be created:
*.dat-file containing header information
*.R32-file containing the data
*.R64-file containing the timestamps
Export Options for a *.nt-file (DynaWorks)

Fig. 585 Export options for a *.nt-file
This export generates the DynaWorks Neutral File Format. This export only supports the export of Waveform data but no support of Statistics (Reduced) data.
Each channel is exported into a separate export file. Additional header are required for some databases.
Detailed information about this export format can be found in the DynaWorks export manual which is available on the DEWETRON CCC-portal (https://ccc.dewetron.com/).
Export Options for a *.h5-file
This export generates a file in HDF5 file format.

Fig. 586 Export options for a *.h5-file
Choose if the file should be exported in a compressed format. This export supports the export of Waveform data and includes metadata but does not support the export of Statistics (Reduced) data.
Export Options for a *.uff-file
This export generates a file in binary or ASCII universal file data set format 58.

Fig. 587 Export options for a *.uff-file
This export only supports the export of Waveform data but no support of Statistics (Reduced) data and has the following export options:
File Format: Choose between Binary and ASCII
Channel Settings: Choose if all channels shall be exported into one common file or if each channel shall be exported into a separate file.
Export Options for a *.imc2-file
This export generates a file in *.imc2 file format.

Fig. 588 Export options for a *.imc2-file
The options allow the definition of the NaN value in the exported file. This export only supports the export of Waveform data but no support of Statistics (Reduced) data.
Export Options for a *.tdms-file
This export generates a file in *.tdms file format for further use in NI LabVIEW.

Fig. 589 Export options for a *.tdms-file
Choose if absolute timestamps should be used for asynchronous data by checking the box. This export only supports the export of Waveform data but no support of Statistics (Reduced) data.
Export Options for a *.nc-file (NetCDF)
This export generates the Network Common Data Format (NetCDF).
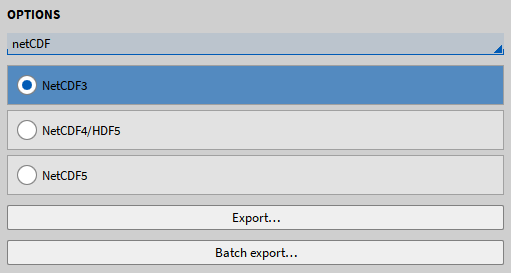
Fig. 590 Export options for a *.nc-file
This export only supports the export of Waveform data but no support of Statistics (Reduced) data. The following versions of this format are available:
NetCDF3
NetCDF4
NetCDF5
Export Options for a *.datx-file (DSPCon)
This export generates a file in *.datx format for use in software from DSPCon
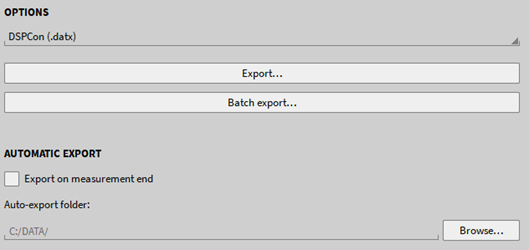
Fig. 591 Export options for a *.datx-file
This export supports synchronous channels only. Asynchronous channels, like those of a power group, cannot be exported.
Batch export
OXYGEN’s Batch export option provides the possibility to automatically export several *.dmd-files successively with the same export settings. To do so, open the first *.dmd-file that shall be exported and go to the Export menu.

Fig. 592 Export menu
Select the desired export format (including the individual options) and the channels to be exported (see ① in Fig. 592). Press the Batch Export button next (see ② in Fig. 592).
A popup window will open that allows the user to select other *.dmd-files whose data shall be exported with the same export settings that are selected for the first file (see Fig. 593). After selecting all desired files, press Open.
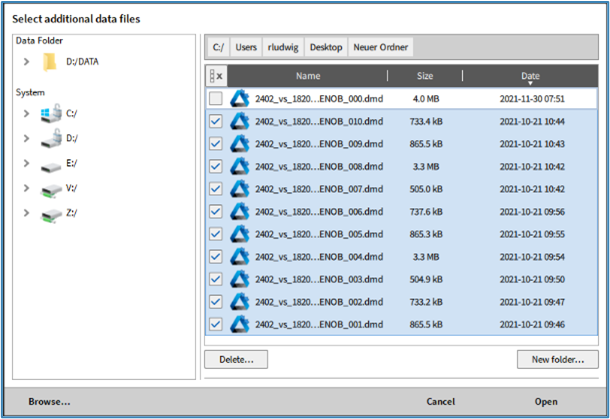
Fig. 593 Popup window to select additional *.dmd-files for export
The batch Export menu will open listing all selected *.dmd-files (see Fig. 594). The destination folder for the exported files can be specified.
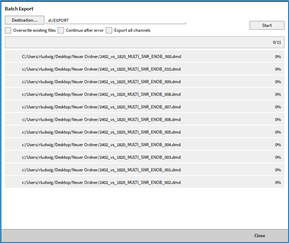
Fig. 594 Batch Export menu
Three additional options can be selected :
Overwrite existing files
Continue after error
Export all channels
Press Start to initiate the batch export. The progress will be displayed while the export is running. The export file name will be equal to the *.dmd-filename.
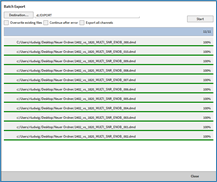
Fig. 595 Batch export window after export is finished
After the export is finished (see Fig. 595), the Batch Export window can be closed.
Note
In case only certain channels shall be exported the selected channel’s names must be the same in all *.dmd-files. Alternatively. It is possible to export all channels from the selected files.
All *.dmd-files that are selected for the batch export must be in the same folder.
Each *.dmd-file is exported into one separate file.
Data is always exported from measurement start to measurement end. Active recorder/cursor regions will be ignored.
Errors occurring during the export could be the following:
Channel not found: A channel that is selected for export is not included in one of the *.dmd-files
File not accessible: A *.dmd-file is open in another OXYGEN Viewer
Export file already exists
The batch export will stop in case an error occurs but it is possible to continue with the export in case the option Continue after error is selected.
The file for which an error occurs will be skipped during the batch export.
Automatic Data Export After Measurement End
OXYGEN offers the possibility to export the data automatically after the measurement is finished in one of the above specified file formats including their above specified export options.
To activate the automatic export function, proceed the following steps:
Open the Export menu and enlarge it to the full screen (see Fig. 596):
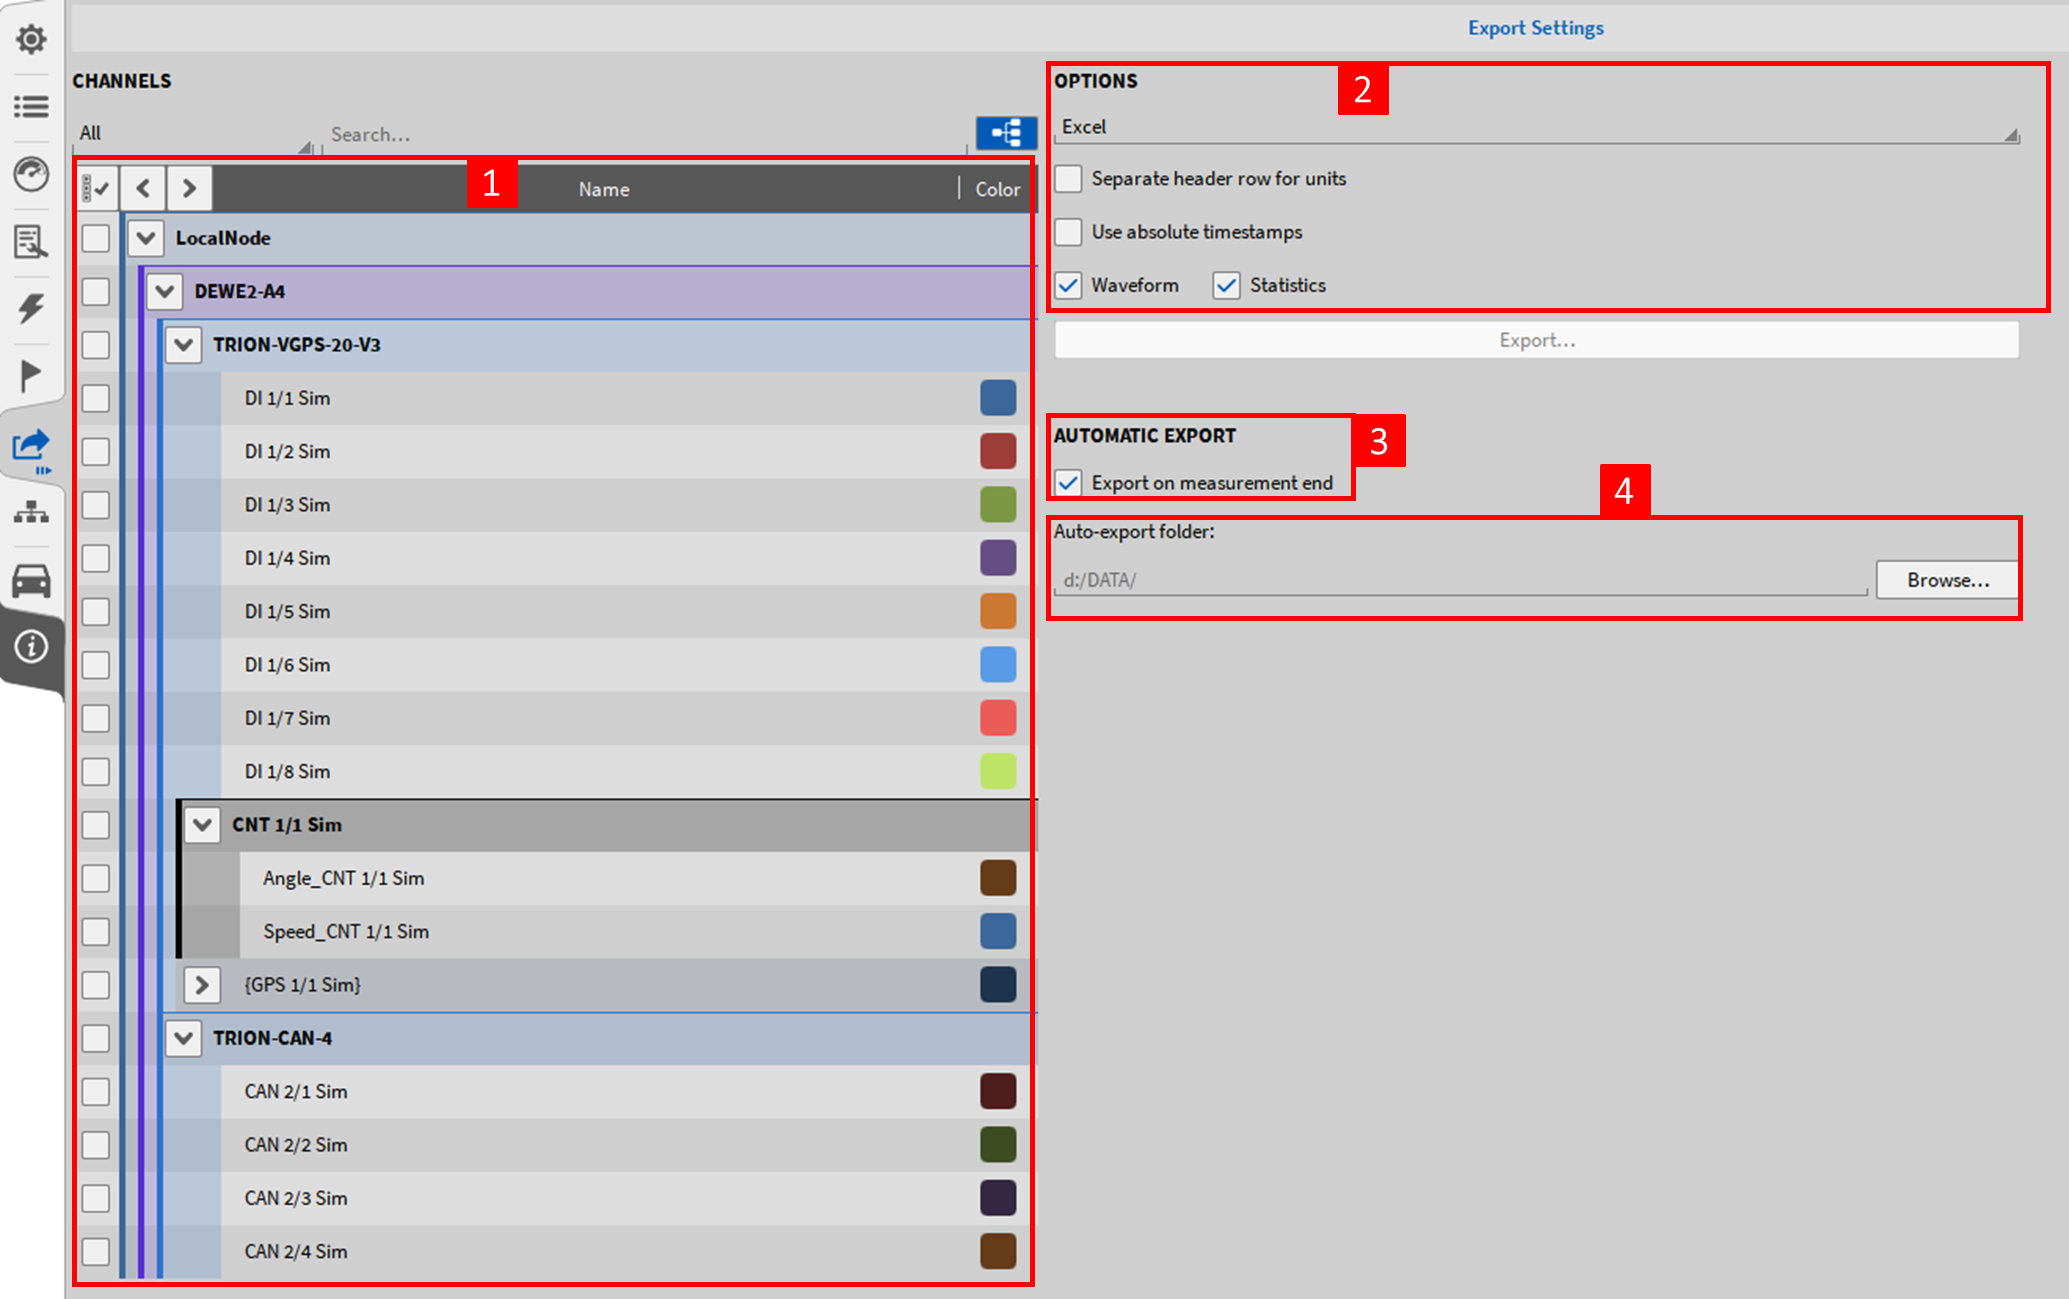
Fig. 596 Export menu, Auto-export settings
Select either all or individual channels that shall be exported automatically after the measurement is finished (see ① in Fig. 596) by checking the certain checkboxes on the left-hand side
Select the desired file format and its individual export options (see ② in Fig. 596).
Check the checkbox Export on measurement end (see ③ in Fig. 596)
Specify the desired directory the export files shall be stored to (see ④ in Fig. 596)
For details about the other export options, refer to