Getting Started
The DEWETRON Explorer is a stand-alone software, which acts as a device manager for DEWETRON hardware and offers multiple functionalities. In addition to the automatic detection of all connected devices, the three main features are:
Check hardware functionality (see Hardware Functionality Check )
Update TRION board firmware (see Firmware Update )
Simuklate DEWEx- and TRION hardware (see Demo System Simulation )
These key features are discussed in more detail in the corresponding chapters. First of all however, lets get started with the GUI and its basic structure. Fig. 4 shows an example of the DEWETRON Explorer GUI with a connected device highlighting different sections of the GUI:
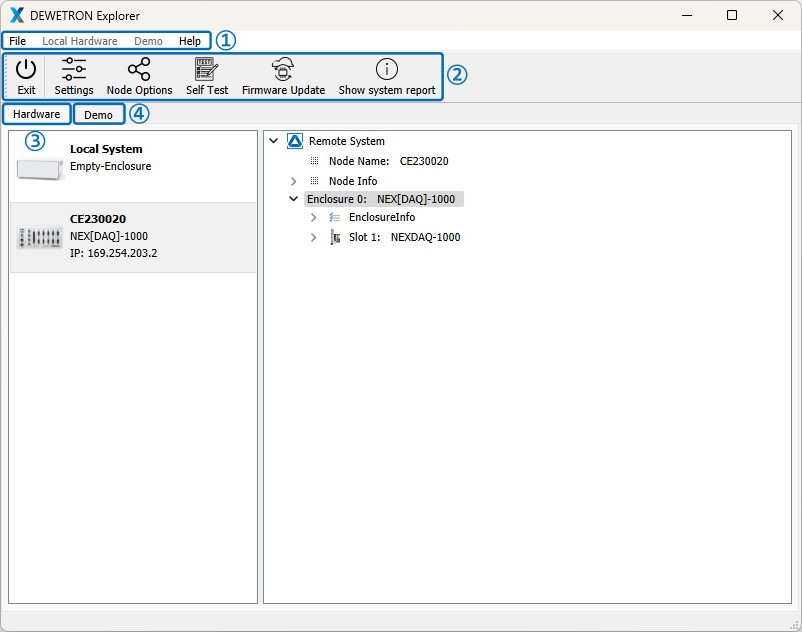
Fig. 4 DEWETRON Explorer example GUI screen
Legend
① Menu Bar ② Toolbar ③ Hardware-tab ④ Demo-tab
Toolbar
The toolbar provides access to various functions and settings via several buttons. The availability of the individual buttons depends on the connected and selected devices. Nevertheless, the following buttons are permanently available:
Exit
Settings
Show system report
Connecting specific devices and modules as well as selecting certain panels in the hardware area will display additional buttons in the toolbar and hence enable further features. These features include:
Node Options
Firmware Update
Board Configuration
Self Test
Feature Update

Fig. 5 Available buttons/functions in the toolbar
Exit
Button to exit the software. If changes have been made it triggers an automatic prompt that asks to save changes. Also accessible via the “File” menu in the menu bar.
Settings
The “Settings” button opens the settings menu (Fig. 6; left panel), providing access to various options. Within the section General, you can customize the color theme of the DEWETRON Explorer to suit your preferences. The section TRIONet Network enables the configuration of TRIONet Networks. For detailed TRIONet network specifications, refer to the TRIONet3 manual.
In the section Developer Options, it is possible to override system hardware with simulated (demo) hardware. Note that this will prevent automatic recognition of local hardware. Additionally, the Developer Options allow you to display factory settings, although this is not recommended unless explicitly advised. The settings menu further includes Log Settings (Fig. 6; right panel), which allow detailed configuration of the local system logging of the TRION API. The settings menu can also be accessed via the “File” menu in the menu bar.
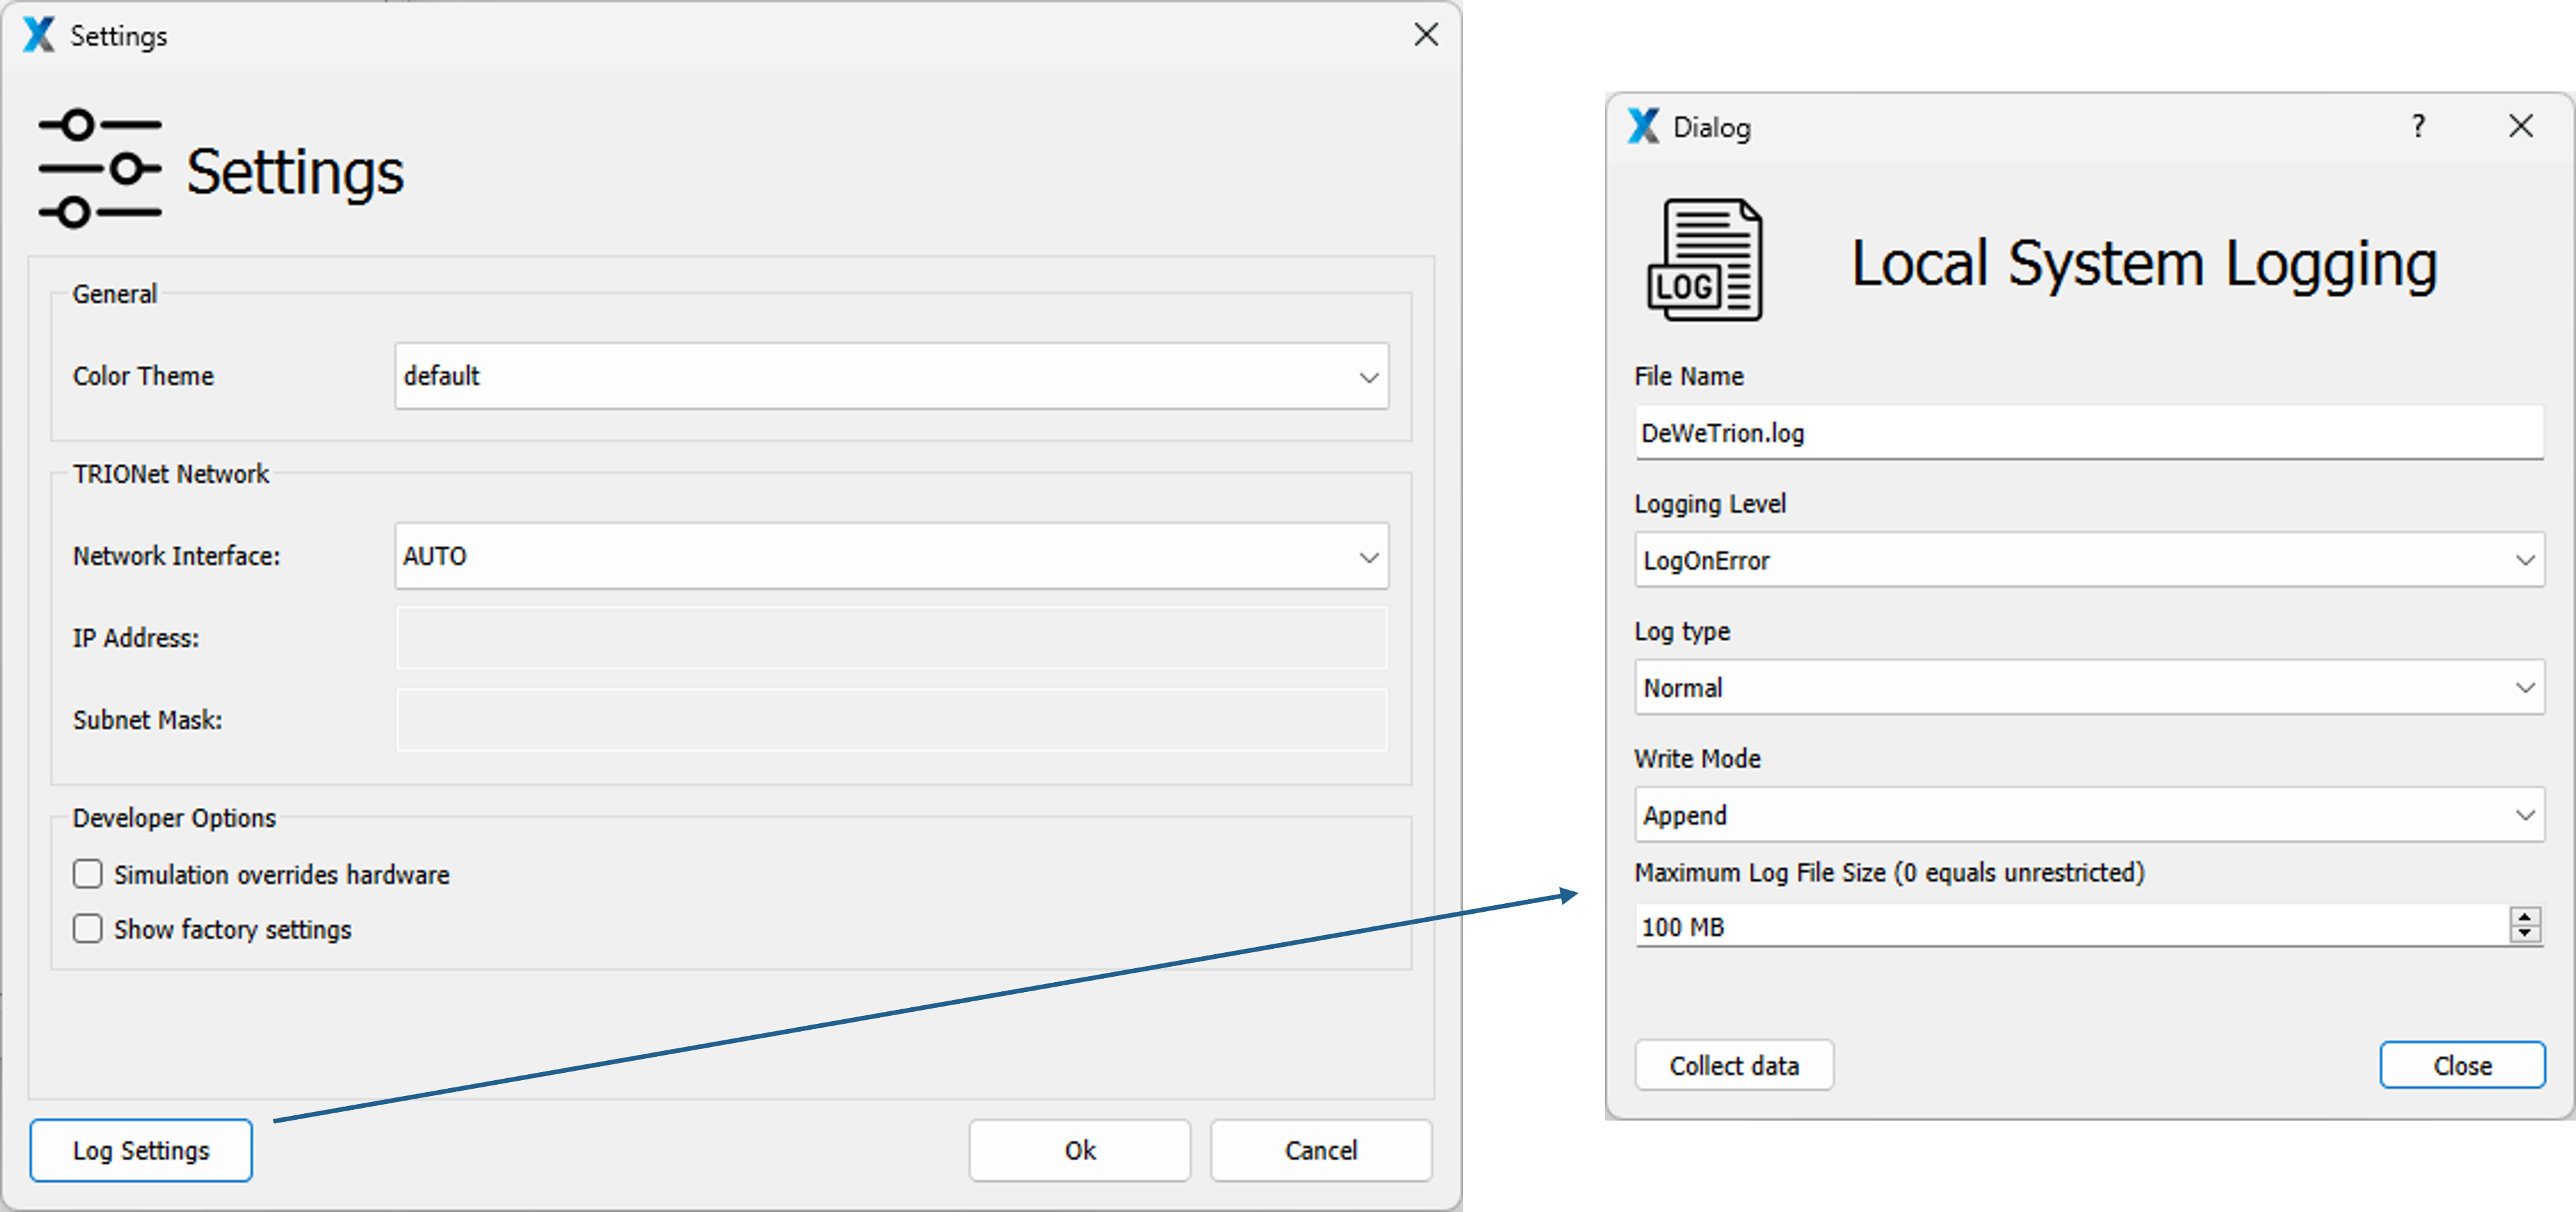
Fig. 6 Left: Settings menu; right: Log Settings
Show system report
The “Show system report” button opens a new window displaying basic system information. These information can be exported to a *.txt file using the “Save” button, which is required for a license upgrade. For more details, refer to Upgrade Chassis Controller License .
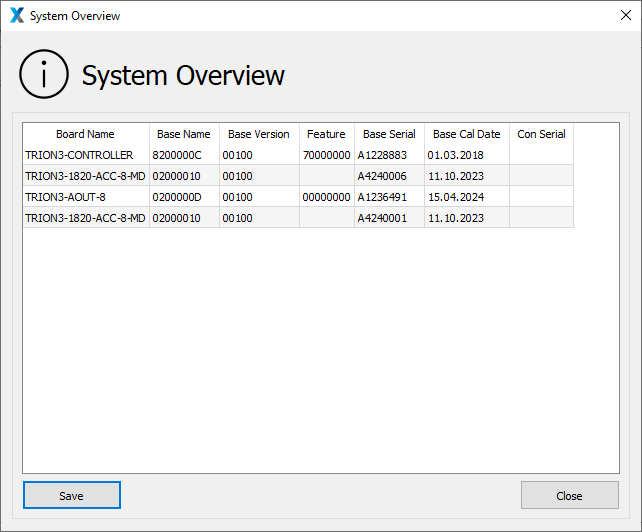
Fig. 7 Show system report menu
Node Opitins
The “Node Options” icon is accessible only when a DEWETRON front-end device is connected to the system. Clicking this button opens the node options menu (Fig. 8 ), providing configuration settings for the connected front-end. It allows users to reboot or restart the node, modify the node’s IP address and name, and update the front-end device’s software. For detailed instructions on updating your device properly, refer to the respective device manual. Additionally, all of these settings can also be customized by right-clicking on the front-end device in the “Hardware” tab.
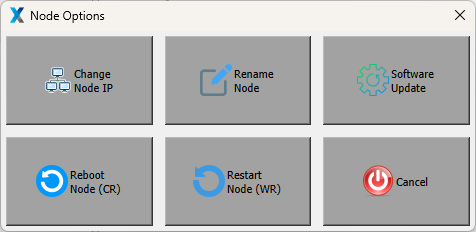
Fig. 8 Node Options
Self Test
The “Self Test” button becomes available either by selecting the “Enclosure” or any mounted slot in the hardware section. This button opens the “Self Test” menu for functionality checks on plugged hardware. Refer to Hardware Functionality Check for a comprehensive description.
Firmware Update
The “Firmware Update” button becomes available either by selecting the “Enclosure” or any mounted slot in the hardware section. This button opens the “Firmware Update” menu allowing you to update the firmware of the plugged hardware. Refer to Firmware Update for an comprehensive description.
Feature License
The “Feature License” button is available for hardware devices with adjustable features and opens the feature license menu. Fig. 9 shows an example using a DEWE3-A4 TRION3-CONTROLLER (Chassis controller). The menu provides information on currently active license features and allows for remote license upgrades on DEWETRON devices. For a detailed guide on upgrading a license, refer to Upgrade Chassis Controller License .
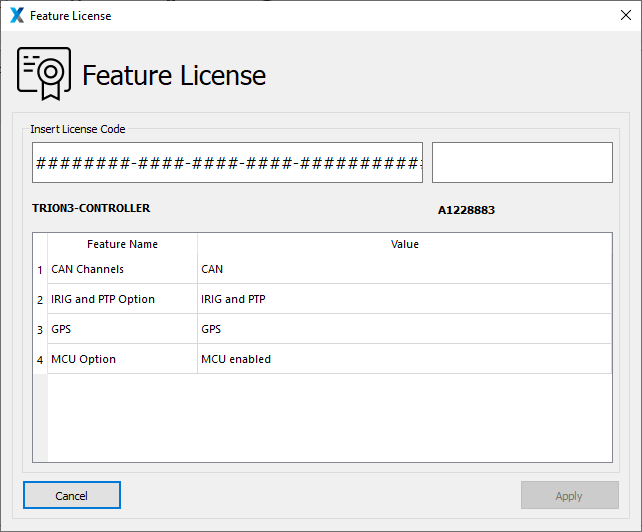
Fig. 9 Feature License menu for TRION3-CONTROLLER
Board Configuration - TRION3-1802/1600-dLV-32
For the TRION3-1600-dLV-32 and TRION3-1802-dLV-32 an additional “Board Configuration” button becomes available, when selecting the module in the hardware section. This button opens the “Board Configuration” menu, allowing to switch between single-ended and differential modes.
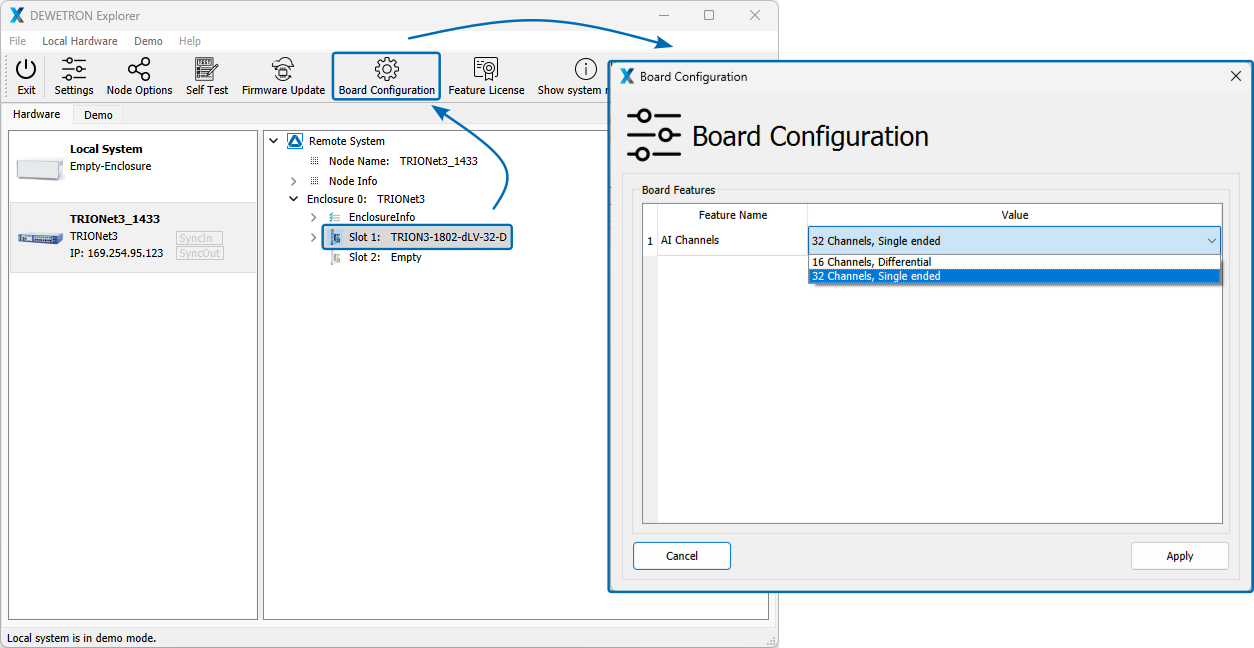
Fig. 10 Board configuration menu for TRION-1802-dLV-32-D.
Hardware section
Fig. 11 highlights the hardware section. The left panel displays all connected devices. In this case this includes the local system (PC) and a connected front-end system (NEX[DAQ]). The right panel displays detailed information about the selected device, such as system specifications, connected modules, and MSIs. Use the drop-down arrows to expand or minimize the displayed information.
Fig. 11 Left: List of all devices detected; right: Details on selected device.
Demo section
Click on “Demo” to switch to the Demo section. This enables the simulation of any DEWETRON device including all available TRION modules. We describe this feature in more details in Demo System Simulation .